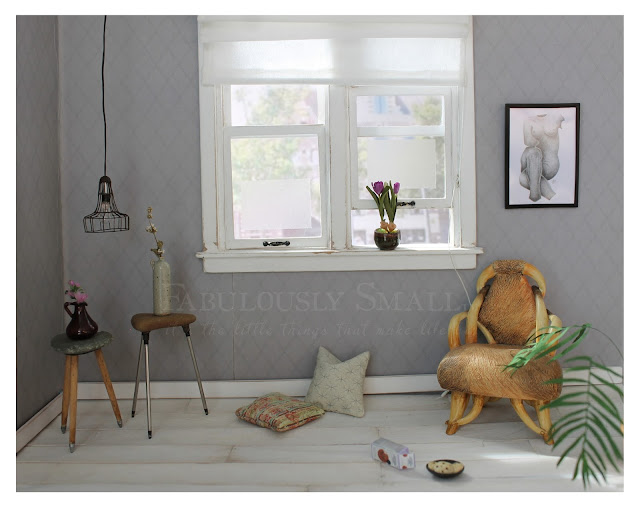
industrial
the 'hint of industrial' is of course the lamp that I made for this display and will go to the Oldtique Store-to-be. I have one like this myself and I thought it be great to make a miniversion of it. I'm not
going into the makings of this lampshade as the process has been ehhh.. how shall I say this nicely? Interesting. Yes, that's a perfect word to describe it and maintain some dignity, haha. But it's not very clear, so: this cage-y-shade (or should I say shady cage? haha) took some serious advantage of my patience and I will never, EVER make one again, just so you know :p. I do like it a lot though!
the process.. - imagine some cursing going on on the background for the duration of it ;). One day, when I was finally getting some real progress without constantly having to doing over what I had already done because it fell apart, the frame fell. Not on the floor, but into a boot, because that's much more convenient right? And not just any boot, but one with a fabric lining on the inside and the wires got stuck in that! Without being able to see what I was doing, because it was beyond the curve, I needed to get it out.. I succeeded somehow, but although I had been very careful, it had quite some bent and loose wires and I had to fix that and get it back into shape.
art
the wall-art is a scaled down and printed drawing I made in my early 20-ies after a statue I loved. The frame I made by cutting thin black plastic strips, glued together to form an L-shape as a base for it and cut the corners in mitre. I couldn't help myself making a hangingpiece on the back :D, I always have way too much fun adding details like that. It's from sodacanmetal I shaped by using a brass strip, made holes in it and glued in tiny pieces of the long pin-part of a brass headpin for 'nails'. It slides over the tiny nail in the wall :D.
rustic
the wooden tabletop is a woodchip from a flowerbed, but I know it's used alongside roads too (in the Netherlands I know I've seen them anyway). They are very fragile, so it might be smart or even necessary to glue the layers together (as they come loose easily. If they're not loose yet, let some superglue flow in the sides to bond). For this very irregular-surface-one that wouldn't hold anything without falling over, I decided to place a 'glass' top over it, connecting them with metal pins. That would make a nice rustic/modern-mix.
 |
| it is actually level, it just seems off because of the angle of the picture |
the bed of woodchips it came from:
I made it of Shrinky Dink cut into the shape double the size of the woodchip (it says it shrinks 3 times, but I had a testpiece of a 3cm square, which should have shrunk to 1cm, but after the maximum time only shrunk to 1,5 cm, possibly because I lay it on the rack in the oven as opposed to the bottomplate which would get hotter). Also made holes in them with a pin, 2-3 times what it should be after shrinking.
unfortunately I'm kind of a superglue-fan and used that to glue the pins in the glass top forgetting that superglue ruins glass and plastic surfaces. All the pins were already glued in the woodchip when I noticed (but luckily I only used glue on the other pins on the part that went into the wood). So this is just an 'old' table with some kind of glass damage. And - again - lesson learned: must remember that superglue and glass or plastic don't mix!
the legs are glass tubes from pipettes with metal tubing inside, with pins as ends painted black and aluminum foil wrapped and glued around the top of the legs. I like them!
→ but because there had been years between making the top & writing most of this post and making the legs, I had forgotten about the superglue of course and seriously did it again. Which explains the misty and stained look of the glass legs.. Aahhh...! :D
another use for woodchips is art. On a pin and base for on a (side)table or as wall art.
vintage
the small stone sidetables are from regular gardenpebbles. Ready to use in this flat triangular shape, isn't that great? One is a bit chipped, probably from colliding with the other stones in the bag I kept them in, because I had found it in the garden in perfect condition ;(.
but that's okay, it has vintage written all over it anyway, I decided it's just a good few years old already and probably got knocked over a few times on a flagstone floor I'm sure :D Sounds plausible right?
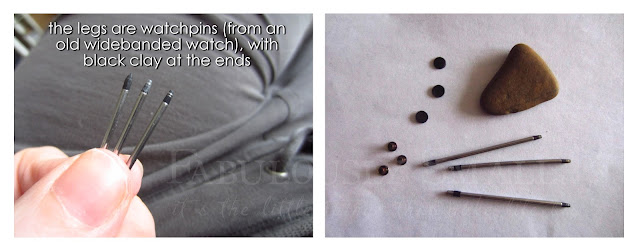
the legs of the ocker one are the metal pins from an old widebanded watch I had saved years ago when getting rid of the old watches they were attached to (but had almost thrown the pins away too!) with some milliput around the ends and some thin painted foil and paper around the tops for a layered effect.
The legs for the grey one are pieces of a wooden dowel, cut and lightly sanded into this shape. The metal endpieces are ballpointtips and give the legs a nice finish. A small piece of wire glued in the opening of it, pinch or handdrill a little hole in the wooden leg and glue in place, finishing them with some embossingpowder in the seams.
they fit well in a '50-ies to '70-ies setting, but also contemporary and in all kinds of interiors depending on your choice of legs and finishings.
So, there you have it! And for anyone who had not seen it back then, the Roman blinds work, see this little video I made about that, if you like to of course ;):


Hi Monique! It is so nice to see a new post from you.
ReplyDeleteI love your miniature scene. Wonderful ingenuity with the watch parts and pens. It worked out perfectly. Most of all I LOVE the Roman Blinds!
Thank you for all these amazing ideas! I'm especially in love with the wood chip table. Would love to live in that room!
ReplyDeleteHugs,
Kat
Nice lampshade! Sorry about the boot...Very cool fun idea with the wood chip :) This is a very interesting post.
ReplyDeleteMe encanta la mezcla de estilos en la habitación,has colocado detalles perfectos y armoniosos creando un ambiente cómodo y muy acogedor!!!
ReplyDeleteBesos.
Thank you for sharing your wonderful ideas! The lampshade and sidetables are modern and vintage at the same time. So well done!
ReplyDeleteYou have been bust Monique and what beautiful creations. Your lampshade was well worth the effort and looks amazing. I love the sculpture drawing, the wood art and the tables look perfect. Stunning and beautifully done! :0)
ReplyDeleteHi Monique!!! I am always thrilled to see a post from you! :)
ReplyDeleteThe Industrial part of this charming vintage scene is what I admire so much about your creativity.... you don't quit til you get it right!!! Who would think something so "simple" looking would be so challenging to make? Right? I am completely un-tried with metal-working.... it seems to me to be so "unforgiving" in it's nature! It intimidates me completely, so I really admire those who master it!! And that shade (that casts no shade) is a work of art! I am glad you succeeded! I remember the Roman shades from before, and can relate to your need to put the hanger on the back of the artwork.... I mean, how else is it to hang? I add hooks and loops with wire to almost all my wall art.... because I can't bear to glue things to walls!!! The little tables are so "period" they really do make a statement. Your creativity with bits and pieces to assemble them is true to form.... I mean who thinks to keep old watch strap pins??? (I have kept old watch faces for use as clocks, but did not think of the pins!) I am so glad you are doing well.... and I want you to know I was thinking this morning about that painting I am going to send you!
Hello Monique,
ReplyDeleteThat is beautiful. the artwork you chose is perfect and your mix of industrial and rustic elements is spot on. The accessories are all beautiful and very realistic.
Big hug
Giac
So creative! I like all the details a lot.
ReplyDelete::waving:: and happy to 'see' you around here.
I Loooooove your rustic glass and wood-chip table Monique and Applaud the ingenuity by which you've made it. The same goes for you cage light shade and your picture hanger. Your insistence on adding the EXTRA FINE detail and the precision accuracy in all of your work, ALWAYS leaves me feeling a sense of AWE over each project you do. BRAVO!!!!
ReplyDeleteJust fantastic work! Thanks for sharing.
ReplyDeleteI always forget that about superglue too, don't worry! XD
ReplyDeleteI love the wire cage light - I'd love to try something similar myself at some point!
¡Qué detalles mas bonitos!
ReplyDeleteME GUSTA EN ESPECIAL LA LÁMPARA. Gracias por el tutorial.
Hi Fabulously Small Team,
ReplyDeleteMy name is Anuj Agarwal. I'm Founder of Feedspot.
I would like to personally congratulate you as your blog Fabulously Small has been selected by our panelist as one of the Top 100 Miniature Blogs on the web.
http://blog.feedspot.com/miniature_blogs/
I personally give you a high-five and want to thank you for your contribution to this world. This is the most comprehensive list of Top 100 Miniature Blogs on the internet and I’m honored to have you as part of this!
Also, you have the honor of displaying the badge on your blog.
Best,
Anuj
Hi Anuj, I'm so sorry for my late response, but I like to thank you for select my blog on your Top 100, I'm honored! And thanks for letting me know! Bye, Monique
DeleteHoi Monique!
ReplyDeleteGoed om weer eens een blog van je te lezen :). Je hebt weer wat moois gemaakt, vooral de tekening vind ik erg mooi. Dank voor alle uitleg, die heb ik opgeslagen op m'n eigen interne harde schijf (koppie) altijd makkelijk voor ooit.
Groetjes en hoop dat je een beetje kunt genieten van het mooie weer,
Knuf, Gee
I love your display, and need to take some more time to read and digest all your fantastic ideas and tutorial information. Such great ideas, love to try my hand at making your lamp, did you just use glue or did you use a soldering iron? Jenn
ReplyDeleteHi Jenn, sorry for my late response (not so good at replying my comments these days..). Thank you for your compliments! For the lampshade I used superglue, I think it would be impossible to solder it without a mold and even then..), it was a curse-inducing excercise I have to say.. ;) and not something I'm likely to ever do again. Not to discourage you, but to warn you. And hopefully it will not be as bad as you expected, haha! Bye! Monique
Delete